Catch Auto Store
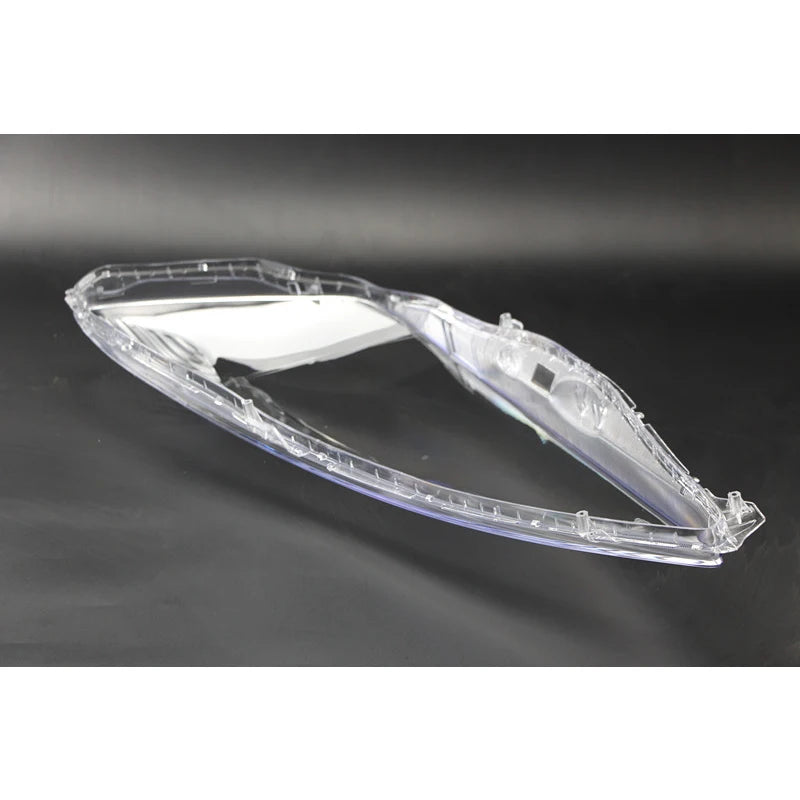
Car Front Headlight Glass Lampshade For Honda Fit 2008 2009 2010 Left/Right Replacement Lens Glass Cover Clear Headlamp Shell
Car Front Headlight Glass Lampshade For Honda Fit 2008 2009 2010 Left/Right Replacement Lens Glass Cover Clear Headlamp Shell
MADE TO ORDER • ESTIMATED DELIVERY 4–6 WEEKS
Couldn't load pickup availability
NZ-BASED SUPPORT • SECURE CHECKOUT • FITMENT HELP AVAILABLE
SPECIFICATIONS
Brand Name: Istraukimas
High-concerned chemical: none
Material: PVC
OEM NO.: For Honda Fit 2008 2009 2010
Origin: Mainland China
Special Features: Car Front Headlight Glass Lampshade
Suitable For Lamp: Headlights
Car Front Headlight Glass Lampshade For Honda Fit 2008 2009 2010 Left/Right Replacement Lens Glass Cover Clear Headlamp Shell
Please carefully check if the lampshade matches the vehicle when placing an order. If you are unsure, you can take a photo of the vehicle and send it to me
Specification:
Fitment:For Honda Fit 2008 2009 2010
Material:PVC
Lens Color: Transparent
There are three types of packaging sets, packaging according to your selection
1.Package : Left*1
2.Package : Right*1
3.Package : 1 Left + 1 Right
Installation instructions for lampshade(If you don't know how to install it, you can go to a car repair shop)
1. If you have oven, as long as remove the lamp back cover, bulb, and then put in the oven temperature to 80 degrees, heating for 10 minutes, the glue will soften, lampshade and shell is easier to separate
2. If you don't have an oven, you can only use a hot air gun. The hot air gun first heats the sharpest corner of the headlight, slowly heating it bit by bit, softening it, and then inserting it with a flat screwdriver. Please be careful not to use too much force to avoid damage. When heating until it feels a bit hot when wearing gloves, stop! (Note: The temperature should not be too high to prevent damage to the headlights)
3. After heating, quickly and forcefully scrape the corner. Be sure to wear gloves to scrape, and the gloves should not shed hair to avoid excessive force
4. Experienced and proficient, one minute is enough from heating to peeling off. If it doesn't go smoothly, continue to heat the separated area with a hot air gun, and when the glue softens, it will be easy to peel off with hand force
5. Clean the glue in the rear shell glue sink as much as possible, wear gloves, and then remove the decorative frame from the lampshade and install it on a new lampshade
6. Cover the glue with a pointed lid and use scissors to cut open the lid (note that only a small diagonal opening is needed). Apply glue into the groove (if the glue flow rate is too small, cut it larger), ensuring that the glue reaches half to two-thirds of the height of the glue tank (do not break the glue, try to ensure consistent height)
7. Press the new lampshade onto the back shell. If any adhesive is found to be leaking, it can be left untreated for now. After the adhesive dries out, everything will fall off with a blade. If there is adhesive on the surface of the lampshade, wipe it with a cloth to clean it
8. Note: We suggest that you air dry the car in a ventilated environment for three to five days before installing it. Do not wash the car or get caught in the rain for a week to avoid water infiltration
Note:
1.Light shooting and different displays may cause the color of the item in the picture a little different from the real thing.
2.Please make sure this item will fit your vehicle before you purchase.
3.Due to age, some vehicles will require new weatherstripping behind these lens.


NOT SURE ABOUT FITMENT? Contact us with your vehicle year and variant before ordering.
SHIPPING & DELIVERY
SHIPPING & DELIVERY
This product is made to order. Estimated delivery is approximately 4–6 weeks.
Tracking information will be provided once your order has been dispatched, where available. Delivery times are estimates and may vary due to manufacturing, international freight or customs delays.
WHAT'S INCLUDED
WHAT'S INCLUDED
- Front bumper components
- Front grille
- Bonnet / hood
- Fender / guard components
- Exterior body panels
- Lighting components where specified
- Underbody / protection components where specified
- Mounting hardware where supplied
INSTALLATION & WARRANTY
INSTALLATION & WARRANTY
Professional installation is recommended. Body modifications, painting, wiring, alignment and adjustment may be required depending on the vehicle and kit configuration.
Warranty coverage varies by product and manufacturer. Damage caused by incorrect installation, misuse or modification may not be covered. Your rights under applicable New Zealand consumer law are not affected.